
Step-by-Step Guide to Building a Classic Picket Fence
Building a Classic Picket Fence is a timeless and charming addition to any property. Here’s a comprehensive guide to constructing one, based on the provided diagram.
ARTICLES
1/18/20252 min read
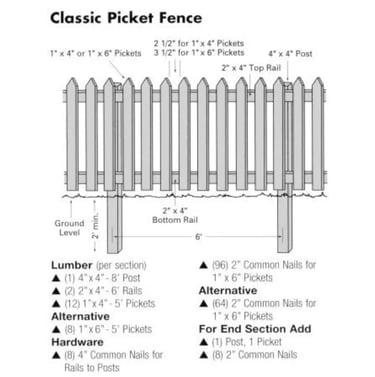
Materials Needed (Per Section)
Lumber:
• Posts: (1) 4” x 4” - 8’ Post
• Rails: (2) 2” x 4” - 6’ Rails (top and bottom)
• Pickets:
• (12) 1” x 4” - 5’ Pickets or
• (8) 1” x 6” - 5’ Pickets (alternative)
Hardware:
• Nails for Rails to Posts: (8) 4” Common Nails
• Nails for Pickets to Rails:
• (96) 2” Common Nails for 1” x 4” Pickets or
• (64) 2” Common Nails for 1” x 6” Pickets
Additional for End Section:
• (1) Post, (1) Picket
• (8) 2” Common Nails
Step-by-Step Instructions
Step 1: Plan and Prepare
1. Measure and Mark:
• Determine the total length of the fence and mark the positions for each post at 6-foot intervals.
• Decide on the spacing between pickets (typically 2–3 inches).
2. Dig Post Holes:
• Dig holes at least 2 feet deep to ensure stability.
• Use a post hole digger or auger to make the holes uniform.
Step 2: Install Posts
1. Set the Posts:
• Place the 4” x 4” posts in the holes.
• Pour concrete into the holes around the posts for added stability.
• Ensure posts are level and plumb using a level.
2. Allow to Set:
• Let the concrete cure for 24–48 hours before attaching rails.
Step 3: Attach Rails
1. Cut and Align Rails:
• Cut 2” x 4” rails to 6 feet if not pre-cut.
• Align the bottom rail 2 inches above ground level.
• Place the top rail approximately 4–6 inches below the top of the posts.
2. Secure Rails:
• Attach rails to the posts using 4” common nails.
• Double-check alignment and level.
Step 4: Add Pickets
1. Position Pickets:
• Start at one end, aligning the first picket with the post.
• Use a spacer block to ensure even gaps between pickets.
2. Nail Pickets:
• Secure each picket to the rails using 2” common nails (two nails per rail per picket).
• Continue along the section, ensuring consistent spacing and alignment.
Step 5: Final Touches
1. Inspect and Adjust:
• Ensure all nails are flush and pickets are straight.
• Sand any rough edges.
2. Seal and Protect:
• Apply weather-resistant paint or stain to extend the fence’s lifespan.
Tips for Success
• Use a string line to ensure a straight fence line.
• Invest in pressure-treated wood to resist decay and insects.
• Regularly inspect and maintain the fence to prevent damage.
For professional installation or custom fence designs, reach out to ProHands Handyman Services!
📞 +1 (818) 401-7766