
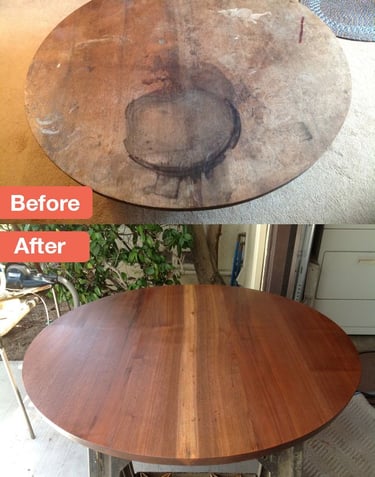
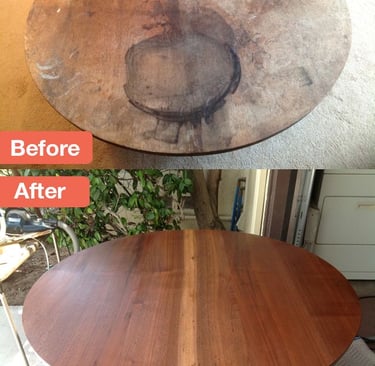
Restoring Wooden Tables: Bringing Old Beauty Back to Life
Over time, wooden tables can suffer from scratches, stains, water damage, and overall wear. Instead of replacing your cherished furniture, consider restoring it! A well-done restoration can preserve the history of a piece, enhance its beauty, and save you money. In this article, we’ll guide you through the process of wood table restoration step by step.
ARTICLES
3/19/20252 min read
Why Restore a Wooden Table?
✔ Cost-Effective – Refinishing is often much cheaper than buying a new solid wood table.
✔ Sustainability – Reducing waste and repurposing existing furniture is an eco-friendly choice.
✔ Preserving Value – Antique or high-quality wood furniture can be restored to increase or maintain its worth.
✔ Customization – You can refinish, stain, or paint the table to match your interior style.
✔ Sentimental Value – Many tables hold family memories and deserve to be brought back to life.
Tools & Materials Needed for Table Restoration
To properly restore a wooden table, you’ll need:
Sandpaper (80 to 320 grit) or a sanding machine
Wood stain or finish of choice
Wood filler for cracks or gouges
Wood conditioner for an even stain application
Polyurethane, wax, or oil for a protective top coat
Wood glue and clamps (if repairing broken parts)
Steel wool or scrubbing pad for cleaning grime and buildup
Oxalic acid or wood bleach to remove dark stains
Paint stripper (if removing old layers of paint or finish)
Lint-free cloths and brushes for application
Step-by-Step Guide to Restoring a Wooden Table
Step 1: Assess the Damage
Check for deep scratches, water rings, burns, stains, and structural damage.
Decide whether a full refinish is needed or just minor repairs.
If the table is painted and you want to expose the wood, you’ll need a paint remover.
Step 2: Clean the Surface
Use a mild wood cleaner or a mix of vinegar and water to remove dirt and grease.
Scrub gently with steel wool for heavy buildup.
Let the table dry completely before proceeding.
Step 3: Sanding the Table
If refinishing, use 80–120 grit sandpaper to remove old stain or finish.
For smooth finishing, follow up with 220–320 grit sandpaper.
Always sand in the direction of the wood grain to avoid scratches.
Remove dust with a damp cloth before applying the next step.
Step 4: Repairing Cracks and Scratches
Fill small cracks and scratches with wood filler that matches the wood color.
For deep stains, use oxalic acid (wood bleach) to lighten discoloration.
If the table has loose joints, apply wood glue and use clamps to secure it.
Step 5: Staining or Painting the Table
If staining, apply a wood conditioner first for an even color.
Use a brush or lint-free cloth to apply wood stain, wiping off excess stain.
Let it dry before applying a second coat if a deeper color is desired.
If painting, use a primer first before applying two coats of durable paint.
Step 6: Sealing and Protecting the Finish
Choose a polyurethane (glossy or matte), wax, or oil finish for durability.
Apply the finish with a brush, roller, or cloth.
Allow proper drying time between coats (usually 24 hours per coat).
Buff with fine steel wool between coats for a smooth finish.
Step 7: Final Touches
Reassemble the table if parts were removed.
Polish with furniture wax for extra shine.
Add protective pads underneath to prevent floor scratches.
Tips for a Perfect Wood Table Restoration
✔ Always work in a well-ventilated space to avoid inhaling dust or fumes.
✔ Sand gradually from coarse to fine grit for the smoothest results.
✔ Test wood stain on a hidden section before applying it to the whole table.
✔ Apply finishes in thin, even coats to avoid drips and streaks.
✔ Allow the table to cure properly before heavy use.
✔ Use coasters and placemats to maintain the finish for years to come.
Restore Your Wooden Table with Professional Help!
Want a flawless restoration without the hassle? We offer professional wood refinishing and restoration services to bring your table back to life!
📞 Call or text: 818-401-7766
📍 Serving Glendale, Burbank, Pasadena, Los Angeles, North Hollywood, West Hollywood, Sherman Oaks, Studio City, and surrounding areas.
Contact us today for a free consultation and give your table a second life!