Full Wall and Ceiling Skim Coating in a Round Window Nook After Custom Oak Bench Installation in Los Angeles
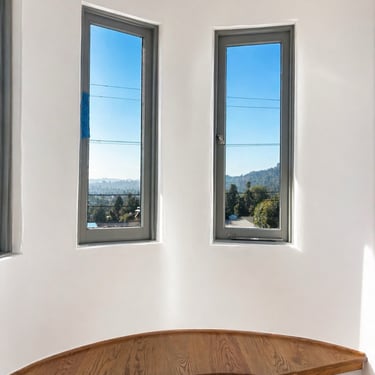
After completing the custom oak curved bench seat, the next important stage of this project was restoring and preparing the walls and ceiling around the entire round window nook. This space had a very unique shape, multiple narrow windows, curved walls, an arched ceiling, and a built-in seating area that had to be carefully protected during the finishing process.
DRYWALLRESTORATIONINTERNAL REPAIRSOUR WORKSPAINTING & STAINING
4/27/20266 min read
The goal was to repair the uneven wall surface, smooth out old imperfections, cover damaged areas, and prepare the entire round room for a clean final paint finish.
This type of work may look simple from the outside, but curved rooms are much more difficult to finish than standard flat walls. Every transition, every window opening, every rounded corner, and every ceiling curve requires careful hand work.
Project Overview
This project included two major parts:
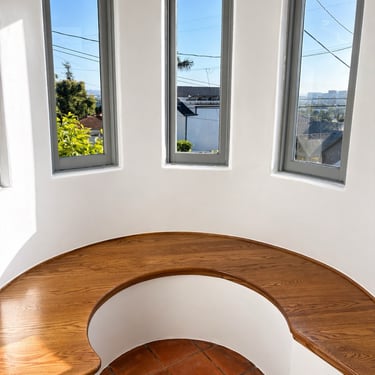
First, we fabricated and installed a custom curved oak bench seat that followed the rounded shape of the window nook. After the woodwork was completed and protected, we moved to the wall and ceiling restoration stage.
The finishing work included:
Protecting the new oak bench seat
Masking the windows and frames
Covering the floor and surrounding surfaces
Scraping loose material from old walls
Repairing cracks and damaged plaster areas
Applying joint compound / skim coat
Smoothing uneven wall and ceiling surfaces
Working around curved walls and narrow windows
Sanding between coats
Preparing the room for primer and paint
The main challenge was the shape of the room. Unlike a regular square room, this space had rounded walls and a curved ceiling, which made every step more time-consuming and detail-oriented.
Why the Walls Needed Full Skim Coating
Before the repair, the walls had visible cracks, old patch marks, uneven plaster, peeling areas, and rough transitions around the windows. In some areas, the surface had been repaired before, but the old patches were still visible.
When a room receives a major upgrade like a custom oak bench, the surrounding walls need to match the quality of the new woodwork. If the walls remain cracked or uneven, the finished project will never look complete.
That is why full skim coating was the right solution.
Skim coating helps create a smoother and more uniform wall surface. Instead of only patching small spots, the entire surface is blended together so the final paint looks cleaner and more professional.
Protecting the Custom Oak Bench Seat
One of the most important parts of this stage was protecting the newly finished oak bench seat. The wood surface had already been stained and sealed, so it needed to be carefully covered before any wall repair work started.
We used protective paper and painter’s tape to cover the bench and prevent dust, joint compound, sanding residue, or paint preparation materials from damaging the finish.
This is especially important when working with stained wood. Unlike painted surfaces, stained oak cannot simply be touched up with wall paint. If joint compound or sanding dust gets into the grain or scratches the finish, it can affect the appearance of the wood.
Good preparation protects the finished carpentry and allows the rest of the work to continue safely.
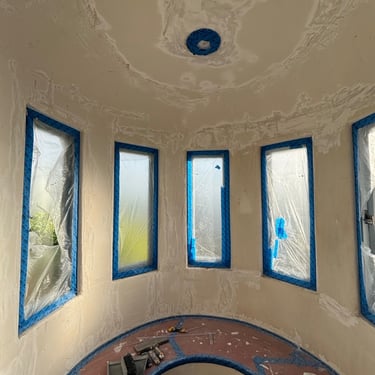
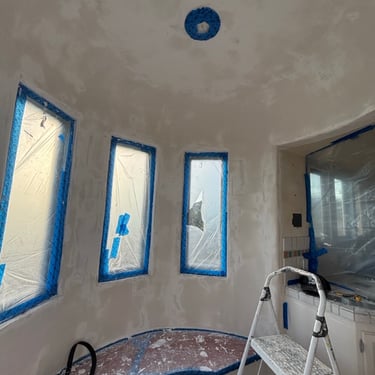
Window Masking and Surface Protection
The room has several narrow vertical windows, each surrounded by wall areas that needed repair. Before applying compound, the glass and window frames were masked with plastic and painter’s tape.
This protected the windows from dust, compound splatter, sanding residue, and primer or paint preparation.
Masking is especially important in rooms with many windows because each opening creates edges, corners, and detailed surfaces that must be finished carefully. The cleaner the masking, the cleaner the final result.
Repairing Cracks and Damaged Areas
The original walls showed several cracks and damaged areas around the window openings and across the curved wall surface. Some of these cracks were likely caused by age, movement, previous repairs, or moisture exposure near the windows.
Before skim coating, loose material had to be removed so the new compound could bond properly. Applying new compound over unstable or peeling material would only create future problems.
The repair process involved cleaning the damaged areas, filling cracks, smoothing rough spots, and blending them into the surrounding wall.
Working With Curved Walls
Curved walls require a different approach than standard flat walls. On a flat wall, it is easier to use long straight tools and create even surfaces. In a rounded room, the wall constantly changes direction, so each pass of the knife or trowel must follow the curve.
This takes more control and patience.
If the compound is applied too thick in one area or not blended properly, shadows from the windows will reveal every imperfection. Natural light is beautiful, but it is also unforgiving. In this room, sunlight enters through multiple windows, which means the wall surface had to be carefully prepared to reduce visible waves and patch marks.
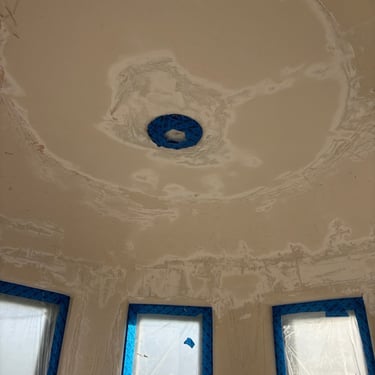
Ceiling Repair and Skim Coating
The ceiling was another important part of this project. Because the ceiling is rounded and connected visually to the walls, it had to be repaired and skim coated as part of the same process.
The ceiling had visible uneven areas, old texture, patch marks, and repaired sections. We applied compound to smooth the surface and blend the transitions.
Ceiling work is always more physically demanding because all work is performed overhead. In a curved space, it becomes even more difficult because the surface is not perfectly flat. The compound must be applied in controlled layers and sanded carefully to avoid uneven buildup.
Multiple Coats for a Cleaner Finish
For a clean result, wall and ceiling repair usually requires more than one coat of compound. The first coat fills deeper imperfections, cracks, and damaged areas. The next coats help smooth and blend the surface.
In this project, multiple areas needed build-up and blending, especially around the window frames, ceiling transitions, and older damaged sections.
The process generally includes:
Surface preparation
First coat for filling and repair
Drying time
Sanding rough areas
Second coat for smoothing
Additional touch-ups where needed
Final sanding
Primer preparation
This step-by-step method creates a better final surface than trying to cover everything in one heavy coat.
Why Good Wall Preparation Matters Before Painting
Paint does not hide wall defects. In many cases, paint makes defects more visible, especially when sunlight hits the surface from the side.
That is why wall preparation is one of the most important parts of any interior remodeling project. Smooth walls make the paint look more even, cleaner, and more professional.
In this room, the final paint finish depended heavily on the quality of the skim coating. The goal was not just to cover old marks, but to create a surface that would look finished in natural daylight.
Detail Work Around Windows
The window openings required special attention. Each window had narrow edges, inside corners, and damaged surrounding areas.
These areas are easy to overlook, but they are highly visible in the finished room. Rough edges around windows can make even a freshly painted wall look unfinished.
We repaired and smoothed the wall surfaces around the window frames so the final paint could create a clean contrast with the gray window trim and the warm oak bench below.
Combining Custom Carpentry and Interior Finishing
This project is a good example of how custom carpentry and interior finishing work together.
The oak bench created the main visual feature of the room. But the surrounding walls and ceiling had to be brought up to the same level. Without proper wall repair, the beautiful woodwork would be surrounded by cracks, rough patches, and old damage.
By combining both stages — custom wood fabrication and full skim coating — the space started to feel complete.
The warm oak seat, white smooth walls, gray window frames, and terracotta tile floor now work together as one finished interior feature.
Challenges of This Project
This was not a simple patch-and-paint job. Several conditions made the work more complex:
The room had a circular layout
The ceiling was curved
There were multiple narrow windows
The old wall surface was uneven
There were visible cracks and damaged plaster
The new oak bench needed full protection
Natural light exposed surface imperfections
The work required careful blending around many edges
These details made the project more time-consuming, but they were necessary for a clean and professional result.
Final Result
After the skim coating and surface preparation, the round window nook looked much cleaner, brighter, and more finished. The wall surfaces became smoother, the window openings looked more defined, and the custom oak bench became the central feature of the space.
The room now feels more intentional and complete — not just repaired, but upgraded.
This kind of detailed work is especially important in older Los Angeles homes, where curved walls, plaster surfaces, unique architectural details, and custom built-ins often require more careful craftsmanship than standard modern construction.
Custom Interior Repair and Skim Coating in Los Angeles
At ProHands Handyman, we work on custom interior repair, finish carpentry, drywall and plaster repair, skim coating, painting preparation, and built-in upgrades throughout Los Angeles and nearby areas.
We can help with:
Wall repair
Ceiling repair
Skim coating
Crack repair
Interior surface preparation
Custom built-in seating
Finish carpentry
Window area restoration
Painting preparation
Interior remodeling details
Whether it is a small wall repair or a detailed custom room restoration, proper preparation makes a major difference in the final result.
Conclusion
This project continued after the custom oak bench seat installation with full wall and ceiling skim coating in a round window nook. The work included protecting the new wood seat, masking the windows, repairing cracks, smoothing damaged surfaces, and preparing the entire space for a clean paint finish.
The result is a brighter, smoother, and more finished interior space where the custom oak bench, curved walls, and natural light all work together beautifully.
If you need drywall repair, plaster repair, skim coating, custom carpentry, or interior remodeling in Los Angeles, Glendale, Burbank, Pasadena, or nearby areas, ProHands Handyman can help.
Call or text ProHands Handyman: 818-401-7766
Send us photos of your project, and we can help review the scope and provide an estimate.