Custom Oak Curved Bench Seat Fabrication in Los Angeles
A custom-built bench seat can completely transform a small architectural space. In this project, our team fabricated and installed a curved oak seating surface for a rounded window nook, turning an unfinished built-in area into a warm, functional, and visually impressive interior feature.
WOODINTERNAL REPAIRSOUR WORKS
4/26/20266 min read
This was not a standard bench installation. The existing structure had a curved shape, multiple window openings, uneven walls, and a rounded inner cutout. Because of that, every part of the wood surface had to be carefully measured, shaped, trimmed, sanded, stained, and finished to fit the space naturally.
The result is a custom oak bench seat with a smooth curved layout, rich wood grain, protective finish, and detailed trim that follows the architecture of the room.
Project Overview
The goal of this project was to create a custom wood seating area inside a rounded bay-style space with multiple windows. The existing base was already formed, but the surface needed a finished wood top that would look elegant, feel comfortable, and fit the unusual curved shape.
For this type of project, standard straight boards or prefabricated furniture pieces would not work. The bench had to be made specifically for the space.
Our work included:
Measuring and templating the curved bench area
Cutting oak panels to match the rounded shape
Creating the inner curved opening
Fitting the wood top around uneven walls
Sanding the edges and surface
Installing decorative wood trim
Staining the oak to bring out the natural grain
Applying a protective finish
Final touch-ups for a clean built-in look
This type of custom carpentry requires patience, accuracy, and attention to detail because every curve must match the existing structure.
Why Oak Was a Good Choice for This Custom Seat
Oak is one of the best materials for custom built-in seating because it is strong, durable, and visually attractive. In this project, the natural oak grain became one of the main design features.
Unlike painted plywood or basic MDF, oak gives the seat a high-end appearance. The grain pattern adds warmth and depth, especially in a sunny window area where natural light highlights the wood texture.
Oak is also practical for a bench seat because it can handle regular use better than many softer woods. When properly sanded, stained, and sealed, it becomes a long-lasting surface suitable for daily sitting, decorating, or use as a cozy reading nook.
Custom Template and Curved Layout
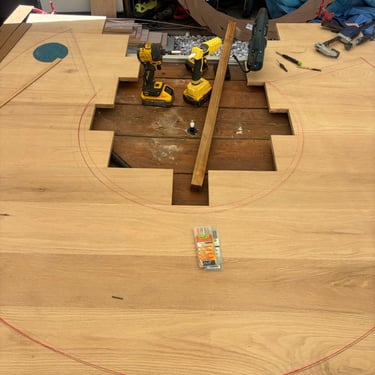
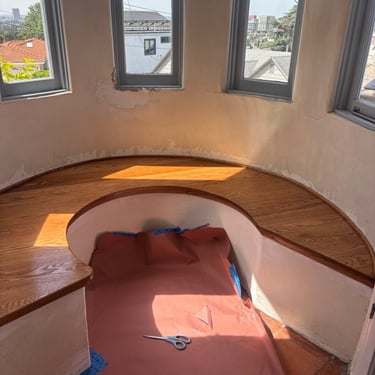
The most important part of this project was the shape. The bench was not rectangular. It followed a wide semicircular wall and also included a curved inner opening.
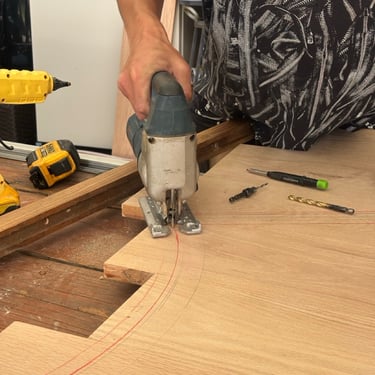
To make the seat fit correctly, we had to create accurate layout lines before cutting. The photos from the work process show the red curved guide lines marked directly on the oak panels. These marks helped us follow the radius and control the shape during cutting.
For a custom curved bench seat, even a small measuring error can become visible after installation. If the curve is off by even a fraction of an inch, the edge may not align with the wall, the trim may not sit properly, or the finished surface may look uneven.
That is why the layout stage was so important.
Cutting and Shaping the Oak Panels
After marking the oak panels, the next step was cutting the curves. For this project, we used a jigsaw to follow the marked lines and form the large outer curve and the inner rounded opening.
Curved cuts require slow, controlled movement. The blade must follow the line carefully without forcing the tool. After the rough cut, the edges still need to be shaped, refined, and sanded.
The work also included adjusting the panels to fit the existing walls. Older homes and custom architectural spaces are rarely perfectly straight or symmetrical. Walls may have slight waves, plaster buildup, or uneven corners. A custom piece must be adjusted to the actual space, not just to a theoretical measurement.
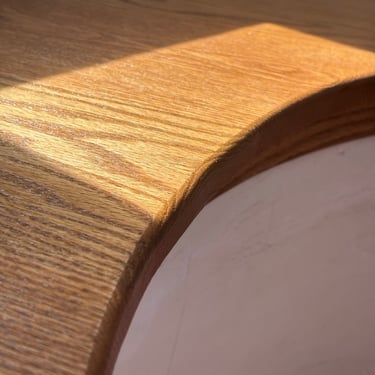
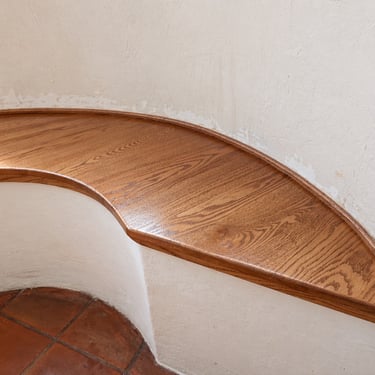
Sanding and Edge Refinement
Once the main shape was cut, the edges were sanded and refined. This step is especially important on a bench seat because people will touch and use the surface directly.
Sharp edges, uneven cuts, or rough sanding marks would make the finished piece feel unfinished. The goal was to create smooth, comfortable edges while preserving the natural look of the oak.
The curved front edge received special attention because it is the most visible part of the bench. A clean edge makes the entire project look more professional and polished.
Decorative Trim Installation
To complete the built-in look, we installed wood trim along the curved edges. The trim helps visually define the bench, hides minor transitions, and gives the seat a more finished furniture-like appearance.
Curved trim work is more complicated than straight trim installation. The pieces must follow the radius smoothly without looking forced or broken. This requires careful fitting and patience.
The trim also helps protect the edges of the seat and creates a more elegant transition between the wood surface and the surrounding plaster base.
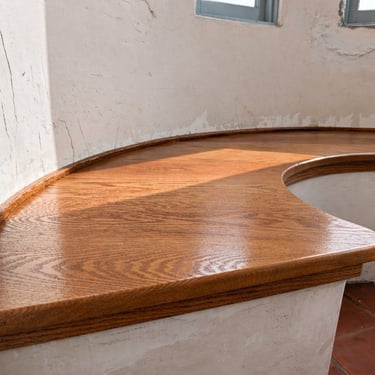
Staining the Oak
After the fabrication and sanding were complete, the oak was stained to bring out its natural color and grain.
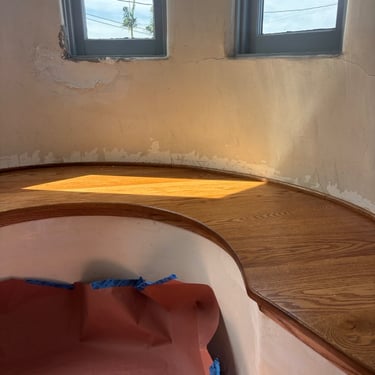
The stain gave the bench a warm, rich tone that works beautifully with the terracotta tile floor and the soft plaster walls. Instead of looking like a separate new addition, the finished seat feels like it belongs to the original architecture of the room.
A good stain should enhance the wood, not hide it. In this project, the oak grain remains clearly visible, which gives the bench character and depth.
Protective Finish
Because this bench seat will be used regularly, we applied a protective finish over the stained wood. This helps protect the surface from normal wear, light moisture, dust, and cleaning.
A protective finish is especially important in sunny areas near windows. Sunlight can highlight imperfections, but it can also make a properly finished wood surface look beautiful. The final coating gave the oak a smooth sheen and helped bring out the natural texture of the material.
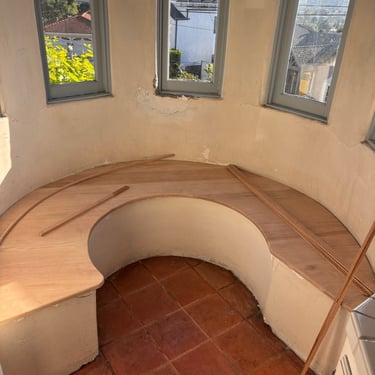
Working Around Existing Walls and Windows
One of the challenges of this project was the condition of the surrounding wall area. The bench was located below several windows, and the walls had visible imperfections, cracks, patching areas, and uneven plaster.
For custom carpentry projects like this, the woodwork must be adapted to the existing conditions. The goal is not only to build a nice wooden seat, but also to make it visually work with the space around it.
The curved oak surface helped improve the overall appearance of the nook, even before the surrounding wall repairs were fully completed. Once the walls are patched and painted, the finished bench will look even cleaner and more integrated.
Why Custom Carpentry Makes a Big Difference
A project like this shows why custom carpentry is sometimes the best solution. Standard furniture would not fit this space correctly. A straight bench would ignore the architecture of the room, and a prefabricated piece would likely leave gaps or look out of place.
Custom work allowed us to:
Follow the exact curve of the wall
Create a seat that matches the shape of the room
Use real wood with a premium finish
Build around the existing structure
Preserve the character of the home
Turn an unused area into a functional feature
This is the kind of detail that makes a home feel more personal and thoughtfully finished.
A Functional and Beautiful Window Nook
The finished bench creates a cozy seating area with natural light, city views, and warm wood tones. It can be used as a reading nook, a small relaxation area, a decorative display space, or simply as a beautiful architectural feature.
The combination of oak, curved lines, terracotta tile, and tall windows gives the space a classic and timeless feel. Instead of a plain unfinished ledge, the room now has a custom-built feature that adds both function and value.
Details Matter in Custom Woodwork
In custom carpentry, the final result depends on many small details:
Accurate measurements
Clean curves
Smooth sanding
Proper trim installation
Consistent stain color
Protective finishing
Careful fitting against existing walls
Each step affects the final appearance. When these details are done correctly, the finished piece looks intentional, not improvised.
This project required both construction skills and finish carpentry experience because the seat had to be strong, comfortable, and visually clean.
Custom Built-In Bench Seats in Los Angeles
Many homes in Los Angeles have unique architectural details: curved walls, bay windows, older plaster surfaces, Spanish-style interiors, custom tile floors, and unusual room layouts. These spaces often need custom solutions rather than standard store-bought furniture.
A custom built-in bench can be a great upgrade for:
Window nooks
Bay windows
Breakfast corners
Entry areas
Reading spaces
Hallway alcoves
Mudroom seating
Decorative interior niches
With the right material and finish, a custom bench can become one of the most attractive features in the home.
Conclusion
For this project, we fabricated a custom curved oak bench seat from raw wood panels, shaped it to match the rounded space, installed decorative trim, sanded the surface, stained the oak, and applied a protective finish.
The final result is a warm, elegant, and functional built-in seating area that follows the original shape of the room and highlights the natural beauty of oak.
Custom carpentry like this is about more than simply covering a surface with wood. It is about understanding the space, working with its shape, and creating a finished element that looks like it was always meant to be there.
If you need custom carpentry, built-in seating, woodwork, trim installation, or interior remodeling in Los Angeles, Glendale, Burbank, Pasadena, or nearby areas, ProHands Handyman can help.
Call or text ProHands Handyman: 818-401-7766
We can review your photos, discuss your project, and provide a detailed estimate.